Newsletter

Be notified when I add new patterns, instructions and videos.

#mc_embed_signup fieldset {position: relative;}
#mc_embed_signup legend {position: absolute; top: -1em; left: .2em;}

.mc-field-group {overflow:visible;}

http://loomknitterscircle.us1.list-manage.com/js/jquery-1.2.6.min.js
http://loomknitterscircle.us1.list-manage.com/js/jquery.validate.js
http://loomknitterscircle.us1.list-manage.com/js/jquery.form.js
http://loomknitterscircle.us1.list-manage1.com/subscribe/xs-js?u=e5a6d3ca134d93a9a737a5797&id=c6d3960d43

join our mailing list

* indicates required
Email Address *

First Name

Last Name

Cable Scarf for Knitting Board

CableScarf Our pattern of the month is a bit late this month, my computer went up in smoke at the end of last month and I didn’t have access to any of my files or pictures.

This month, I would like to share with you one of my first patterns, it is a cable scarf and you can use your Knifty Knitter Long Looms or any other knitting board that you may have around. Be sure to use yarn that works with the sett/gauge of your loom.

Download SimpleCableScarf

If you have any questions, feel free to ask below, I will address the questions each afternoon.

Enjoy!

Isela

v\:* {behavior:url(#default#VML);}
o\:* {behavior:url(#default#VML);}
w\:* {behavior:url(#default#VML);}
.shape {behavior:url(#default#VML);}

Normal
0

false
false
false

EN-US
X-NONE
X-NONE

MicrosoftInternetExplorer4

st1\:*{behavior:url(#ieooui) }


/* Style Definitions */
table.MsoNormalTable
{mso-style-name:”Table Normal”;
mso-tstyle-rowband-size:0;
mso-tstyle-colband-size:0;
mso-style-noshow:yes;
mso-style-priority:99;
mso-style-qformat:yes;
mso-style-parent:””;
mso-padding-alt:0in 5.4pt 0in 5.4pt;
mso-para-margin:0in;
mso-para-margin-bottom:.0001pt;
mso-pagination:widow-orphan;
font-size:11.0pt;
font-family:”Calibri”,”sans-serif”;
mso-ascii-font-family:Calibri;
mso-ascii-theme-font:minor-latin;
mso-fareast-font-family:”Times New Roman”;
mso-fareast-theme-font:minor-fareast;
mso-hansi-font-family:Calibri;
mso-hansi-theme-font:minor-latin;
mso-bidi-font-family:”Times New Roman”;
mso-bidi-theme-font:minor-bidi;}

advertise

LoomKnit.com is one of the most well known websites in the loom knitting industry. It is known for their loom knitting videos, free patterns and tutorials. Our statistics show that the website’s pages get viewed on average 1,200 times a day from visitors all over the world.

Contact me for monthly, bimonthly, quarterly, yearly rates. Get your Ad in front of thousands of loom knitters!

Little Hearts

LittleHearts Materials

Knitting Loom: Baby Hat Knitting Loom in Fine Gauge (1/4 inch from center of peg to center of peg). Sample was knit on 64 peg fine gauge knitting loom by Décor Accents, Inc. http://www.dalooms.com

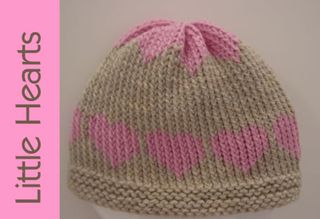
Yarn: 60 yards of worsted weight yarn for main color. 30 yards of worsted weight in contrasting color.  Sample was knit with Caron Simply Soft in pink and brown.

Notions: Knitting Tool, tapestry needle, row counter (optional)

Gauge: 5 stitches and 6.5 rows per inch

Skills Knowledge: Single Stitch (e-wrap twice, lift the bottom loop off the peg), Purl Stitch, Knit Stitch

Pattern Notes
•    Work the knitting loom clockwise (if you have a thumb tack, start by casting on to the left of the thumb tack)
•    Knit Over=Lift the bottom loop off the peg
•    When skipping stitches, just run your yarn behind the pegs to the next peg that needs wrapped.
•    Heart Pattern is a multiple of 8 (7 for the Heart and 1 for a separator)
•    When working with 2 strands of yarn on 1 round, pick up the color called for at the beginning of the pattern, when that color is no longer needed, just let the yarn drop to the inside of the loom and pick up the second color.

•    Repeat instructions inside [ ] the number of times next to it.


DirectionsAbbreviations

With MC, cast on all pegs using the e-wrap method.

Rnd 1, 3, 5, 7, 9: P to the end of rnd
Rnd 2, 4, 6, 8, 10: SS to the end of rnd
Rnds 11-14: SS all stitches
Rnds 15-23: Follow Heart Chart [repeat 8 times around the loom]

Rnd 15: Follow Hearts Chart Row 1 [repeat 8 times to complete the round] Charts

How to work Round 15:
Step 1: With MC: E-wrap 3 pegs, [skip 1, e-wrap 7 pegs] repeat around to last 5 stitches, Skip 1 peg, e-wrap 4 pegs.
Step 2: With CC: E-wrap all the pegs skipped in Step 1.
Step 3: Knit over.

Rnd 16: Follow Heart Chart Row 2 [repeat 8 times to complete the round]

How to work Round 16:
Step 1: With MC: E-wrap 2 pegs, [skip 3, e-wrap 5] repeat around to last 5 stitches, skip 3 pegs, e-wrap 2 pegs.
Step 2: With CC: E-wrap all pegs skipped in Step 1.
Step 3: Knit over

Rnd 17: Follow Heart Chart Row 3 [repeat 8 times to complete the round]

How to Work Round 17:
Step 1: With MC: E-wrap 1, skip 5, [e-wrap 3, skip 5] repeat around to last 2 stitches, e-wrap 2.
Step 2: With CC: E-wrap all the pegs skipped in Step 1.
Step 3: Knit over

Rnd 18: Follow Heart Chart Row 4 [repeat 8 times to complete the round]

How to Work Round 18
Step 1: With CC: [e-wrap 7 pegs, skip 1] 8 times.
Step 2: With MC: E-wrap all the pegs skipped in Step 1.
Step 3: Knit over

Rnd 19-20: Repeat Rnd 18 (Chart rows 5 & 6)

Rnd 21: Follow Heart Chart Row 7 [repeat 8 times to complete the round]

How to Work Round 21:
Step 1: With CC: [E-wrap 3 pegs, Skip 1] 16 times
Step 2: With MC: E-wrap all the pegs skipped in Step 1.
Step 3: Knit over

Rnd 22: Follow Heart Chart Row 8 [repeat 8 times to complete the round]

How to Work Round 22:
Step 1: With MC: Skip 1, [E-wrap 2, skip 1, E-wrap 2, skip 3] repeat around to the last 7 stitches,  E-wrap 2, Skip 1, E-wrap 2, skip 2
Step 2: With MC: E-wrap all the skipped stitches in Step 1.
Step 3: Knit over

Rnds 23-35: SS to the end of rnd

Rnds 36-44: Follow Crown Chart as follows:

Rnd 36: Follow Crown Chart Row 1 [repeat 8 times to complete the round]

How to Work Round 36:
Step 1: With MC: E-wrap 3 pegs, [skip 1, e-wrap 7 pegs] repeat around to last 5 stitches, Skip 1 peg, e-wrap 4 pegs.
Step 2: With CC: E-wrap all the pegs skipped in Step 1.
Step 3: Knit over.

Rnd 37: Follow Crown Chart Row 2 [repeat 8 times to complete the round]

How to Work Round 37:
Step 1: With MC: E-wrap 2 pegs, [skip 3, e-wrap 5] repeat around to last 5 stitches, skip 3 pegs, e-wrap 2 pegs.
Step 2: With CC: E-wrap all pegs skipped in Step 1.
Step 3: Knit over

Rnd 38: Follow Crown Chart Row 3 [repeat 8 times to complete the round]

How to Work Round 38:
Step 1: With MC: E-wrap 1, skip 5, [e-wrap 3, skip 5] repeat around to last 2 stitches, e-wrap 2.
Step 2: With CC: E-wrap all the pegs skipped in Step 1.
Step 3: Knit over

Cut main color leaving a 6 inch tail.

Rnds 39-44: With CC: SS all stitches

Decrease Round:
Rnd: 45: Move every 2nd loop one peg to the right. You will have 32 pegs with 2 loops on each peg. Each peg with 2 loops will have an empty peg next to it.
E-wrap all the pegs that contain the 2 loops on them, skip all the empty pegs.
The pegs should have 3 loops on them. Lift over and off the peg the bottom most 2 wraps.

Rnd 46: Work one round of knit stitch.

Bind off: Remove with the Gather Removal Method

Weave in all ends to the wrong side of the item.
 

Terminology

  • Anchor Peg: It is a peg or thumb tack on the side of the knitting loom. The peg is used in two ways: 1)to wrap the anchor yarn around it when you cast on. 2)To wrap the working yarn around it after e-wrapping a row. Note: it is imperative that you un-anchor the yarn (from 1) from the anchor peg once you have worked a couple of rows.
  • Anchor Yarn: Anchor yarn is used mostly when working on a knitting board. The anchor yarn is typically 3 times the length of the knitting board. You place the anchor yarn on top of the cast on stitches letting the ends dangle down the gap on the board. Tie the ends together to facilitate in pulling down the work and in setting the stitches.
  • Bind Off: (BO) Also known as cast off, it translates into removing the item from the knitting loom. The bind off secures the last row or round of the knitting, without the bind off the loops would unravel and the entire project would become undone.
  • Cable Needle: A short needle (either plastic or wooden) used to hold stitches so that their order can be switched to create cables.
  • Cast On: To set up the first loops on the knitting loom to begin work. Each loop on each peg counts as one stitch. There are various cast on (CO) methods and all them achieve a certain look, if the pattern does not specify the cast on method to use, a good general one is the Long Tail Cast on. 
  • Cast Off: See Bind Off
  • Decrease: To reduce the number of stitches. There are various ways of achieving a decrease, the most common being k2tog, ssk, and k3tog.
  • Double Rake Loom: A knitting loom with two rows of pegs.
  • Dropped Stitch: A stitch that falls off the peg and consequently unraveling the entire stitch column creating a ladder-like effect. To prevent it from unraveling the entire column pick it up as soon as you see it. 
  • Duplicate Stitch: A technique borrowed from embroidery. The duplicate stitch is worked on the right side of the fabric when the knitted fabric is complete. You can create motifs or patterns that can add color to your knitted piece.
  • E-wrap: a method of wrapping the knitting loom, when done properly, it forms a cursive lower case “e” around the peg. Used to cast on the knitting loom or as a stitch. As a stitch is known also as the Twisted Knit Stitch and Knit through the Back. 
  • Fair Isle: A traditional form of color stranding named after the Shetland Islands off the coast of Scotland. Fair Isle patterns use many colors and although they appear difficult only 2 colors are worked in a given row.

  • Felting: The process of creating a project and then purposely shrinking it so it becomes denser and stronger. Usually made with untreated animal fiber such as wool or mohair. The process is also known as Fulling.
  • Flat Knit: Refers to knitting a flat panel on a circular loom such as a scarf or blanket. Instead or knitting around the loom, you knit back and forth from right to left or left to right.
  • Flat Stitch: A stitch that creates a small “v”. To create the stitch:

   1.  Bring the working yarn in front of the peg, above the existing loop.

   2. Lift the bottom loop over the working yarn to knit off and over the peg.

   3. With the knitting tool, pull gently on the new wrap to make it less snug around the peg.

  • Flat Removal Method: the process of removing an item from the knitting loom so that the fabric removed ends with an flat opening, such as in a blanket or scarf.
  • Floats: Floats occur when working with 2 or more colors of yarn. A float forms on the wrong side of the fabric when you work with a different color yarn.
  • Fringe: A decorative edge that is formed by yarn strands that are drawn through the edge of the work. Typically shown on scarves.
  • Frog: The process of unraveling a major portion of the fabric off the knitting loom. It comes from the sound the frogs make “rip it, rip it, rip it”.
  • Fulling: See Felting
  • Garter Stitch: A stitch pattern created when you knit one row and purl the next row.
  • Gathered Removal Method: The process of removing an item off the knitting loom, commonly used to remove hats/stocking caps off the knitting loom. Thread a tapestry needle with 2-3 yards of yarn, remove each wrap off the pegs and slide them down to the working yarn on the tapestry needle, once all the wraps have been removed from the loom, pass the tapestry needle one more time through the first wrap you removed, cinch the opening close by gently tugging on the yarn. Weave in the ends.
  • Gauge: Also known as tension, it refers to the number of stitches in a horizontal span of knitting and the number of rows in a vertical span of knitting. Usually measured over a piece of fabric that is at least 4 inches square. Gauge is extremely important and it is recommended that every knitter works up a swatch before starting on a new project and finds the required gauge for the project. If gauge is not achieved, the project will not fit properly. Even if the gauge is 1/4″ off, it will affect the size of the entire project, please double check your gauge. Swatch and gauge is the key!
  • Grafting: See Kitchener Stitch
  • Increase: To add new stitches to the row. There are various ways to achieve an increase, the most common methods: k1f&b, yo, M1.
  • Intarsia: Blocks of color knitting that are worked independently with their own bits of yarn. Yarn is usually wound in bobbins to make it easier to create the desired pictures. The yarns are not carried along the back of the work to create floats as when working Fair Isle, instead, the yarns are twisted at each color change to create a smooth join.
  • Kitchener Stitch: also known as grafting. It is the process of joining two pieces of fabric with live stitches so that the join is invisible.
  • Knit: the term usually used to refer to the activity of knitting.
  • Knit Off: also known as knit over, it refers to the process of removing a wrap from the peg. With the knitting tool, hook the wrap on the peg and lifted up and off the peg.
  • Knit Stitch: one of the basic stitches in the loom knitting and
    knitting world. To create a knit stitch. Place working yarn in front
    and above the wrap on the peg. Insert knitting tool through the bottom
    of the wrap thus hooking the working yarn and forming a new loop. Hold
    the newly formed loop with fingertips, take the wrap off the peg and
    place the new loop that you are holding on the peg. Tug on the working
    yarn gently to tension the wrap.
  • Knitting Board: A double sided rake. It has two rows of pegs. It creates double sided fabric.
  • Mattress Stitch: A method of joining invisibly two pieces of fabric together, perfect to use when seaming.
  • Notions: items that may be needed to complete the project, such as buttons, cable needles, zippers, etc.
  • Purl Stitch: the opposite of a knit stitch. It is created similarly to the Knit stitch for the exception that the working yarn is placed below the wrap on the peg. 
  • Place stitches on holder: remove the stitches off the pegs and placed them on a stitch holder. If not stitch holder is available, you can use a piece of scrap yarn.
  • Pom Pom: an embellishment created by forming a ball with strands of yarn. Commonly seen on top of hats.
  • Rake Loom: Another term for knitting loom.
  • Ribbing: A type of fabric that lays flat and has horizontal stretch. Commonly used around hems of sweaters and hats.
  • Round: Used when working circularly around the loom.
  • Row Counter: a tool that allows the knitter to keep track of the number of rows/rounds they have worked. The knitter must click or move the dial to set the row counter to the new number.
  • Single Rake: A knitting loom with one row of pegs.
  • Schematic: A diagram that gives the dimensions of the finished item.
  • Seam: To join to pieces together.
  • Secure Ends: See Weave ends
  • Selvage: The term given to the vertical edges of a knitted fabric.
  • Slip Knot: An adjustable loop. To begin your cast on, you will need to begin with a slip knot.
  • Slip Stitch: The process of skipping the peg either by simply running the working yarn behind the peg and then working the next peg, or by running the working yarn in front of the peg and working the next peg.
  • Slipped Edge: When the first peg at the beginning of each row is skipped, the edge of the knitted fabric has a chain-like appearance. The first peg is skipped by simply running the yarn behind the peg to the front of the next peg and working that peg in the designated stitch. 
  • Stockinette Stitch: A fabric created by working each row in Knit Stitch or E-wrap Twisted Knit Stitch
  • Swatch: Refers to the creation of a test piece of fabric made as a test to find the gauge of your tension
  • Tink: The process of undoing your knitting one stitch at a time. The work KNIT spelled backwards.
  • W&T: Refers to Wrapping and Turning when creating short-rows.
  • Waste Yarn: A piece of scrap yarn that will be removed later on in the project. It is recommended to use a brighter color than the project, non-texture yarn.
  • Weave Ends: The process of hiding and securing all the tail ends from the work to the wrong side of the fabric or along the selvage. To weave the ends, follow the Z pattern and simply go down 1 inch in one direction, then 1 inch in the opposite direction, then one inch in the other direction, forming a letter Z. Trim the tail as closely as possible to the fabric, do not tie a knot as a knot can leave unsightly bumps.
  • Working Yarn: The yarn that is coming out of the skein/ball of yarn and you are working with on the knitting loom/board.


http://w.sharethis.com/button/sharethis.js#publisher=35434287-263d-4be3-8720-1bbf1e610a34&type=website

Cables Baguette

CablesBaguette400 A whimsical baguette that will enhance any wardrobe! Knitted on a round knitting loom as a flat panel.  The bag has one chunky middle cable, and 2 side mock cables!

**If adapting to a different knitting loom gauge, use the yarn recommended for the gauge of loom.

Level3

Materials

  • Knitting Loom: Any with at least 30 pegs Sample was loom knitted on Red Knifty Knitter
  • Yarn: 120 yards of Super Bulky Weight Yarn. Sample was knitted with Lamb’s Pride Burly Spun
  • Other: 6″ Circular Handles or D-Shape
  • Optional: Ribbon and a bag liner

Skills Knowledge: Purl stitch, Single Stitch (1 over 1), Flat Panel Knitting Seaming: Mattress Stitch for seaming the sides Sewing: (optional) for Bag Liner–simple straight sewing by hand or by sewing machine.

*Size varies according to yarn and loom gauge.

Price: $4.99

Add to Cart


http://w.sharethis.com/button/sharethis.js#publisher=35434287-263d-4be3-8720-1bbf1e610a34&type=website&embeds=true

Lexi Bag

LexiBag400 Level2


Materials

  • Loom: Large Gauge Knitting Loom. Knifty Knitter Green Round Loom or any other loom with at least 21 pegs.
  • Yarn: 150 grams of chunky weight wool. Debbie Bliss Cashmerino Chunky was used in sample.
  • Notions: Knitting tool, tapestry needle
  • Other: 2 yards of ½ inch wide Gross Grain Black Ribbon. D Shape handles ( 7 inches in width x 4.5 inches in height)

Size
7 inches x 7.5 inches x 3.5 inches (not including handles)

Gauge

6sts x 10 rows= 2 inches in stockinette stitch

Skills Knowledge

Knit stitch, purl stitch, k2tog, flat panel knitting, basic bind off.

Price: $4.99

Add to Cart


Add a picture of your finished Lexi!

#flickr_badge_source_txt {padding:0; font: 11px Arial, Helvetica, Sans serif; color:#666666;}
#flickr_badge_icon {display:block !important; margin:0 !important; border: 1px solid #000000 !important;}
#flickr_icon_td {padding:0 5px 0 0 !important;}
.flickr_badge_image {text-align:center !important;}
.flickr_badge_image img {border: 1px solid black !important;}
#flickr_www {display:block; padding:0 10px 0 10px !important; font: 11px Arial, Helvetica, Sans serif !important; color:#3993ff !important;}
#flickr_badge_uber_wrapper a:hover,
#flickr_badge_uber_wrapper a:link,
#flickr_badge_uber_wrapper a:active,
#flickr_badge_uber_wrapper a:visited {text-decoration:none !important; background:inherit !important;color:#3993ff;}
#flickr_badge_wrapper {background-color:#ffffff;border: solid 1px #000000}
#flickr_badge_source {padding:0 !important; font: 11px Arial, Helvetica, Sans serif !important; color:#666666 !important;}

www.flickr.com

http://www.flickr.com/badge_code_v2.gne?count=3&display=latest&size=s&layout=h&context=in%2Fpool-lexybag%2F&source=group&group=1379704%40N22


http://w.sharethis.com/button/sharethis.js#publisher=35434287-263d-4be3-8720-1bbf1e610a34&type=website&embeds=true

publications

Loom Knitting

http://ws.amazon.com/widgets/q?ServiceVersion=20070822&MarketPlace=US&ID=V20070822/US/loomknitdesig-20/8001/275f7e26-4642-40c9-a839-b3bf705af6b9 Amazon.com Widgets

How to Knit Needle Free: Knitty.com

Loom Knitters Circle Magazine: Various patterns and tutorials


Television

KnittyGritty Episode on LoomKnitting on DiYnetwork

PBS: Knit&Crochet Today


Needle Knit Designs

Love Scarflet sold at Soysilk

Cables for Baby: Luxury Yarn One-Skein Wonders

Earflap Hat: 2009 Pattern-a-Day (May 14) Cover

_________________________________________________________________________________________

Errata

about

Isela G. Phelps started LoomKnit.com in 2004 in an effort to gather in one spot all the information/patterns she had created over the years. She is a mom of two wonderful children, Nyah and Bryant. She resides in Cache Valley, UT, with her family. In her spare time, she enjoys participating in marathons, triathlons and cycling races. She especially enjoys being a part of events that benefit causes such as Multiple Sclerosis and Breast Cancer awareness.

Isela has been featured in television shows, podcasts, and magazines, including Knitty Gritty, PBS Knit&Crochet Today, CraftyPod, and Knitty. 

Isela is the best-selling author of various loom knitting books: Loom Knitting Primer, Learn to Knit Cables on Looms, Learn to Knit Socks on Looms, and Loom Knitting Pattern book. Her designs have also been included in various needle knitting books: Luxury Yarn-One Skein Book, 2009 Pattern a Day Calendar. 

Currently, she is a co-editor of Loom Knitters Circle magazine, an online loom knitting magazine.

Tutorials

The following tutorials have been prepared to help you in your loom knitting journey. Please note that all of this work has taken countless of hours and research. If you need to use this information for a class, a book, a video or something else, please contact me first. 

*Denotes PDF files. 

Rounds & Rakes Tutorials