I have been knitting Messy Bun Hats since last Friday. I have knitted 8 with the previous pattern and now I am about to embark in knitting 9 with this new design.
The pattern is very similar to the original one, except this one has stockinette instead of single ribbing sections. Also, rather than decreasing slowly, I did the last round as k2tog all the way around. Click here to download the pattern from Ravelry. NOTE: PATTERN IS NEEDLE KNIT. Currently, I do not have a loom knitted version of it.
These hats are flying off my needles and to my friends’ homes. I have had a few requests for a needle knit version. The above was knitted on size 10.5 and 11 size needles. You can use either dpns or circulars. The pattern is super simple and it goes quite fast. NOTE: PATTERN IS NEEDLE KNIT. Currently, I do not have a loom knitted version of it.
Pattern is available free via Ravelry, click on link to be directed to download page. Or also click on the image above to be taken to Ravelry to download the pattern.
It has been awhile since I last created a video, but some of you (about 50 requests in less than one day) were requesting a video showing how to do the Messy Bun Hat. I apologize for the small screen. I only have my phone to take video. I hope the video helps out some of you. Have a great holiday!
NOTE: If you are using a different knitting loom than what is called in the pattern, keep the following in mind:
Pattern requires a peg count that is a multiple of 4 (40, 44, 48, etc)-the ribbing on the brim requires this multiple.
The hat be at least 7-7.5 inches in length from cast on to bind off. If you need to knit more rounds, repeat rounds 15-22 to maintain the stitch pattern.
The Messy Bun hat allows you to keep your "do" intact while keeping you nice and toasty. My daughter sports a messy bun almost every day, so a messy bun hat was a must for our freezing Utah winters.
Yarn: Approx 90 yds of bulky weight blend acrylic/wool yarn. Sample was knit with Mighty Stitch Bulky in Ash.
Notions: knitting tool, tapestry needle.
Other: Oval Cord Elastic by Dritz, about 1 yard. Used for bind off method 2.
Gauge: 6.5 sts x 8 rows=2 inches
Abbreviations
k=knit stitch (may use the u-stitch)
p=purl stitch
rnd(s)=round(s)
st(s)=stitch(es)
INSTRUCTIONS
Cast on 40 sts, prepare to work in the rnd.
Rnd 1-10: *k2, p2; rep from * to end of rnd.
Rnd 11-14: k to end of rnd.
Rnd 15-18: p to end of rnd.
Rnd 19-22: *k1, p1; rep from * to end of rnd.
Rep Rnds 15-22.
Next 4 rnds: p to end of rnd.
Bind off method 1: Bind off with basic bind off method (keep the bind off tight).
Bind off method 2: Oval Cord Elastic by Dritz (about a yard). Using tapestry needle, thread the elastic through the tapestry needle. Remove all the stitches off the loom onto the elastic. Once all the stitches are on the elastic, cinch it close, leaving about a 6-inch circle of elastic, tie a knot to secure it. Cut the ends of the elastic. To secure further, use needle and thread and sew the ends of the elastic together.
Weave ends in. Block lightly if needed.
NOTE: If you are using a different knitting loom than what is called in the pattern, keep the following in mind:
Pattern requires a peg count that is a multiple of 4 (40, 44, 48, etc)-the ribbing on the brim requires this multiple.
The hat be at least 7-7.5 inches in length from cast on to bind off. If you need to knit more rounds, repeat rounds 15-22 to maintain the stitch pattern.
Feeling very lucky in being one of the first few to have received a complimentary set of the Zippy Master set. Receiving this kit allowed me to try it out and think about the wonderful possibilities of having a kit with all the pieces that I need to create tubular items, in a couple of different sizes. The only thing that I am missing to make this kit complete is a bag to put all the little pieces in so I don't lose them (hint, hint KB!).
If you haven't seen the set yet, have a look, here is a video that KBLooms.com put together for all their customers. It is truly a great kit! With the kit, you have the option of creating two different sizes of circular items, one with 20 pegs (all 4 sides, and the corners with the pegs), and one with 16 pegs (all 4 sides and the corner connectors). What does this mean? It means that you can create hats for adults and children with this kit! You can also use the peg rails and the straight connects and double knit! How exciting is this! It is something that I truly want to try–a nice super bulky cowl is in my future! Utah winters can be rough!
Were you one of the lucky ones who bought the Zippy when it was first released? No worries, you can connect your other Zippys to this kit and make a bigger loom!!!
In my excitement, combined with the current Olympics, I had the perfect excuse to sit down and knit this cozy blanket. I hope you enjoy the pattern. If you have any questions about it, please leave me a comment and I will be happy to assist you. The pattern in itself is very simple, if you know to create the knit stitch, you can create this afghan. The beauty of this pattern–I had this blanket done in less than 15 hours from start to finish! I have to admit that the hardest part was adding the fringe to the blanket. It is quite distracting to add fringe when your favorite swimmer(s) are performing and you have to make small little knots. I hope you enjoy the pattern and give the kit a chance!
You don't have a kit and are low on funds due to the back-to-school spending extravaganza? Leave me a comment on this blogpost with "what you would like to make with this kit". I will pick 1 (one) winner on August 26, at noon (MST) and I will send you a kit and two skeins of yarn for you to try it.
Can't wait and you want your very own? Hop on over to KBLooms.com and get your Zippy Master Set today!
Purling Sprite's Zippy Lapghan
Wrap yourself in a cloud of softness during those cold fall evenings with this luxurious lapghan.
Knitting loom: Zippy Master Set (used 4 sides, and 4 corners with pegs)
Yarn: 605 yds of Super Bulky (#7) yarn. Lion Brand Color Clouds – Alchemists Aqua was used in sample (11 skeins).
The much awaited moment has finally arrived! It has been months in the making and designing of these corners. Coming up with different ideas that would fit and perform as desired. Was very lucky to be one of the team members who helped designed aka dream these corners. I have enjoyed playing with them over the past couple of months.
It allows us to make circular items in super bulky gauge, such as the in vogue-bulky knits that are hitting the runway right now.
It allows to create larger panels without having a 5 foot long knitting loom–dreaming up chunky blankets!
The Dream:
Being part of the designing team allowed me to give input on the ease of assembly. I wanted an item that I could assemble easily, without having to wrestle the knitting loom down on the ground to fit the pieces together. I also wanted to have markers that will allow me to clearly "see" how I needed to assemble them. I also imagined a corner that was sturdy enough that will hold its own, meaning, a piece that won't break by being only "1" peg.
The Assembly:
Assembling the Zippy loom with corners has never been so simple! The corners are sturdy enough to maneuver without worrying about breaking, yet light weight to keep the knitting loom still a comfortable weight. Assembling is truly a matter of sliding and hearing it "pop" into place. Removing it is also that simple, slide it out of the groove the opposite way that it went in.
You can purchase your very own set of corners now at kblooms.com! Grab a set and let me know what you make with your circular Zippy!
And because I cannot tell you about a new loom without a pattern, here are two quick and easy patterns to try out on your new Zippy Corners! Slipped Purl Cowl & Chills Away Cowl.
Time to go Blog Hopping and check out the other fun patterns for the Zippy Corners!
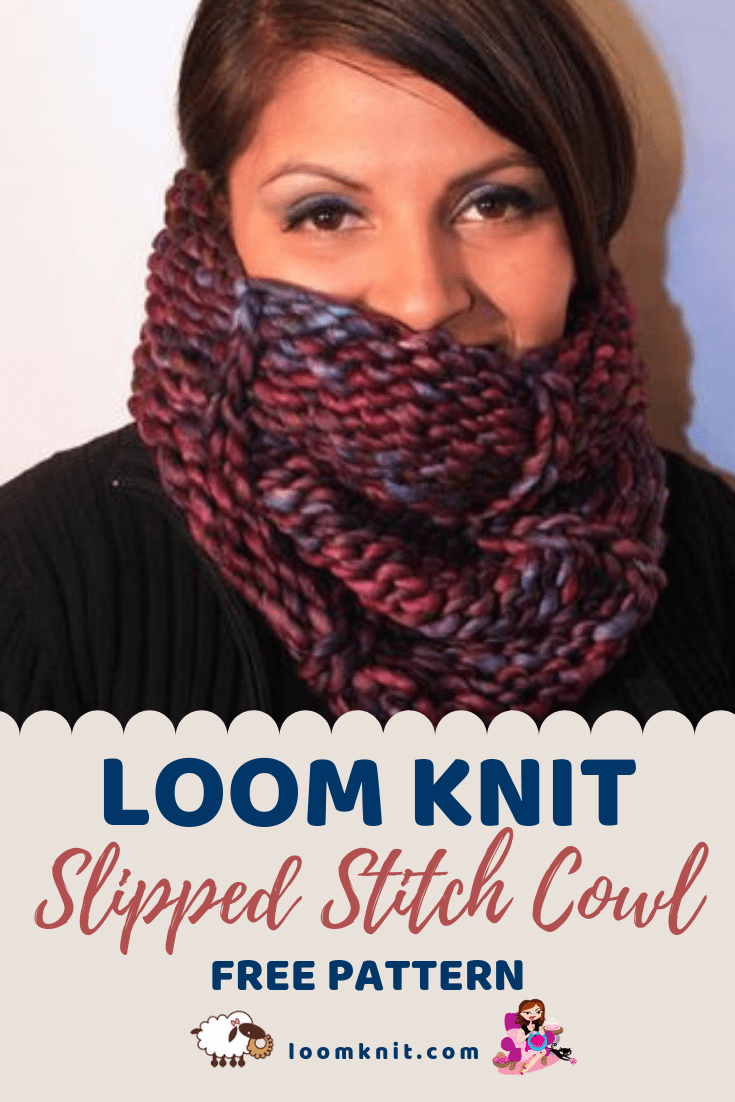
Yarn: 80 yards of Super Bulky wool. Malabrigo Rasta, shown in Abril was used in sample (less than 1 skein).
Notions: Knitting tool, tapestry needle
Gauge: 5 sts x 7 rows= 4 inches
Abbreviations
P=purl stitch
K=knit stitch
Slwyb=Slip with yarn back. Skip peg with yarn towards the back of the peg.
St(s)=stitch(es)
Rnd(s)=Round(s)
INSTRUCTIONS
Set up knitting loom as shown on this picture: Use 1 connector to connect 2 zippy looms together, repeat with the other 2 Zippy looms. Place corners at each end of the two rails. Slide the remaining two Zippys at each end, connecting them to the rails with the corners.
Cast on 28 sts using the ewrap cast on.
Round 1: *p6, k1; rep from * to the end of rnd.
Round 2: *p6, sl1wyb; rep from * to end of rnd.
Repeat Rnd 1 and Rnd 2 until about 30 inches of yarn remain.


 Feeling very lucky in being one of the first few to have received a complimentary set of the Zippy Master set. Receiving this kit allowed me to try it out and think about the wonderful possibilities of having a kit with all the pieces that I need to create tubular items, in a couple of different sizes. The only thing that I am missing to make this kit complete is a bag to put all the little pieces in so I don't lose them (hint, hint KB!).